Setting up your machine
This section covers all the programs that we use on our machines daily and how we like everyone to set them up.
Some of these tools have their own dedicated pages. But this page would highlight defaults which are expected to be seen in all developer machines.
We run ubuntu! so this section only has instructions for ubuntu.
Please don't install software from snap or the software center.
Zsh
When we open a terminal, what we see is called a shell. Linux/Unix have a good collection of shells. The one that comes by default in ubuntu is called bash.
We use z-shell or zsh. It sports things like better completion, auto-correct and a few other niceties.
$ sudo apt install zsh
There is a handy file called ~/.profile. We need zsh to use it as well.
$ ln -s ~/.profile ~/.zprofile
Go ahead and create a bin folder in your $HOME, where your custon scripts
will live.
$ mkdir ~/bin
Oh my zsh
This is zsh framework/config that provides a solid base to start using zsh. Set it up with
$ sh -c "$(curl -fsSL https://raw.github.com/ohmyzsh/ohmyzsh/master/tools/install.sh)"
If you dont have curl installed,
$ sudo apt install curl
At the end, it'll ask you to change the default shell to zsh. Please do it!
Logout and log back in. Open a terminal and hey presto!
Adding your own stuff to zsh
Since we're using oh-my-zsh, we need to add our own tweaks to it like custom
environment variables or updates to $PATH in a specific location.
$ touch ~/.oh-my-zsh/custom/myconfig.zsh
Add stuff you need in this file.
Node.js
We live and breathe javascript. We use a tool called nvm for our nodejs needs.
This allows us to have multiple versions of node installed on our machines.
$ curl -o- https://raw.githubusercontent.com/nvm-sh/nvm/v0.39.1/install.sh | bash
This will update our ~/.zshrc or ~/.bashrc file with a $PATH update for nvm.
Open the file and locate a section like (usually at the bottom)
export NVM_DIR="$([ -z "${XDG_CONFIG_HOME-}" ] && printf %s "${HOME}/.nvm" || printf %s "${XDG_CONFIG_HOME}/nvm")"
[ -s "$NVM_DIR/nvm.sh" ] && \. "$NVM_DIR/nvm.sh" # This loads nvm
Cut it and then paste it in our ~/.oh-my-zsh/custom/myconfig.zsh file.
All custom shell updates need to go here.
Open a new terminal and type in nvm. You should see the help output from nvm.
To install the latest node release,
$ nvm install node
After that completes, node, npx and npm should be available in your $PATH
i.e you should be able to run those commands.
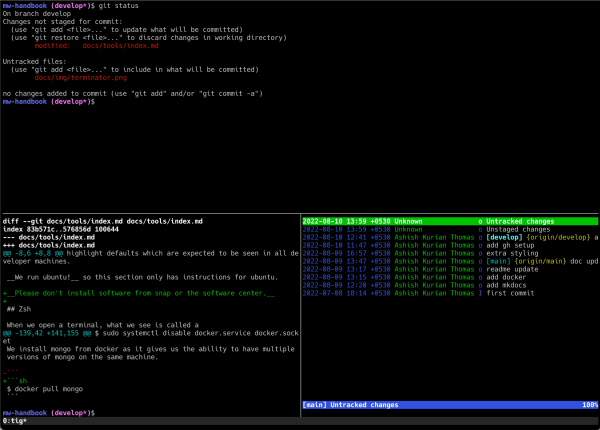
Git
Git is what we use for version control.
$ sudo apt install git
Copy the following to ~/.gitconfig
[alias]
  ps = "!git push origin $(git rev-parse --abbrev-ref HEAD)"
  pl = "!git pull origin $(git rev-parse --abbrev-ref HEAD)"
  ff = pull --ff-only
  ls = log --oneline --all --graph --decorate
[diff]
  compaction-heuristic = true
  noprefix = true
[rebase]
  autostash = true
[user]
  name = john-mw
  email = john@mindwaveventures.com
[push]
  default = current
[color]
  status = auto
  diff = auto
  branch = auto
  interactive = auto
  grep = auto
  ui = auto
[diff]
  colorMoved = zebra
[init]
  defaultBranch = main
Please change john-mw and john@mindwaveventures.com to what you've
setup in github.
Docker
This is the industry standard for packaging and shipping applications.
Run the following, one by one to install it.
$ sudo apt-get update
$ sudo apt-get install \
    ca-certificates \
    curl \
    gnupg \
    lsb-release
$ sudo mkdir -p /etc/apt/keyrings
$ curl -fsSL https://download.docker.com/linux/ubuntu/gpg | sudo gpg --dearmor -o /etc/apt/keyrings/docker.gpg
$ echo \
  "deb [arch=$(dpkg --print-architecture) signed-by=/etc/apt/keyrings/docker.gpg] https://download.docker.com/linux/ubuntu \
  $(lsb_release -cs) stable" | sudo tee /etc/apt/sources.list.d/docker.list > /dev/null
$ sudo apt-get update
$ sudo apt-get install docker-ce docker-ce-cli containerd.io docker-compose-plugin
Now to let your user run the docker command
$ sudo usermod -aG docker $USER
Logout and log back in. Now you should be able to run docker containers.
You can check by running this in the terminal.
$ docker run hello-world
Note: If you dont want docker running when you boot up your machine, run
$ sudo systemctl disable docker.service docker.socket
MongoDB
We install mongo from docker as it gives us the ability to have multiple versions of mongo on the same machine.
$ docker pull mongo
Now we create a container named local-dev-mongo
$ docker run -d -p 27017:27017 --name local-dev-mongo -v data-vol:$HOME/mongodb mongo
This expects a folder called mongodb in your home folder. If not already present,
create it mkdir ~/mongodb
If you wish to get into the container
docker exec -it local-dev-mongo bash
To stop the container,
$ docker stop local-dev-mongo
To remove the container
$ docker container rm local-dev-mongo
Studio3T
This is a handy tool to view our mongo databases. Head over to the download page and get the archive for linux x64.
We should get a studio-3t-linux-x64.tar.gz archive in your Downloads folder.
Extract it and we'll get a studio-3t-linux-x64.sh file.
$ cd ~/Downloads
$ chmod +x studio-3t-linux-x64.sh
$ ./studio-3t-linux-x64.sh
The last command will run the studio3T installer and install it to a default location. You should now have studio3T in your application menu.
Open it up and connect to localhost and set port to 27017
For us old fans of robo3T, we can get it from robo3T's release page.
Mongo CLI tools
Having the mongo cli tools is good for taking a peek into our databases, taking db dumps and other niceties.
Get the latest archive from https://www.mongodb.com/try/download/database-tools. Choose platform as Debian (its the base for ubuntu) and click Download.
$ cd ~/Downloads
$ tar xvf mongodb-database-tools-debian10-x86_64-100.6.0.tgz
$ mkdir ~/Programs
$ mv mongodb-database-tools-debian10-x86_64-100.6.0 ~/Programs/mongo-tools
We downloaded the archive and moved them to its own mongo-tools
folder under ~/Programs folder.
To add the cli tools to our $PATH, so that we can run mongo, mongorestore or
any of those tools, we need to make a small change in our zsh config.
In our ~/.oh-my-zsh/custom/myconfig.zsh file, add
export PATH="$HOME/Programs/mongo-tools/bin:$PATH"
Open a new terminal and we should be able to run mongo and the other cli tools.
PostgreSQL
Same deal as mongodb
$ docker pull postgres
Make a directory for postgres to store data
$ mkdir ~/postgresql
To create and run a container
$ docker run -d \
    --name local-dev-postgres \
    -e POSTGRES_PASSWORD=postgres \
    -e POSTGRES_USERNAME=postgres \
    -v ${HOME}/postgresql/:/var/lib/postgresql/data \
    -p 5432:5432 postgres
To connect to it
$ docker exec -it local-dev-postgres bash
DBeaver
This is a tool we use to view databases. Get the Linux Debian package (installer) from https://dbeaver.io/download/.
We should see a dbeaver-ce_latest_amd64.deb in our Downloads folder.
cd ~/Downloads
sudo dpkg -i dbeaver-ce_latest_amd64.deb
If you get dependency errors when doing this, run
$ sudo apt install -f
Open dbeaver and then connect to our postgres instance.
- Host:
localhost - Port:
5432 - Username:
postgres - Password:
postgres
PostgreSQL cli tools
Go to the postgres docs for latest documentation. Here's the TLDR;
$ sudo sh -c 'echo "deb http://apt.postgresql.org/pub/repos/apt $(lsb_release -cs)-pgdg main" > /etc/apt/sources.list.d/pgdg.list'
$ wget --quiet -O - https://www.postgresql.org/media/keys/ACCC4CF8.asc | sudo apt-key add -
$ sudo apt-get update
We don't want to install postgresql.
Now to install the cli tools
$ sudo apt install postgresql-client-12
or which ever is the current one the above site. After this, we should be able to
run psql or pg_dump from the terminal.
Redis
We use redis as a caching layer for most of our projects. To install it, run
$ docker run -d \
  -p 6379:6379 \
  --name local-dev-redis \
  -v redis-cachedata:/usr/local/etc/redis \
  redis
To hop onto the container, try
docker exec -it local-dev-redis redis-cli
Rabbitmq
Some of our projects require a pub-sub mechanism to be in place. We use rabbitmq for this. To install it, run
$ docker run -d \
  -p 5672:5672 \
  --name local-dev-rabbitmq \
  rabbitmq
To interact with the rabbitmq node, use
docker exec -it local-dev-rabbitmq rabbitmqctl
Here's a nice cheatsheet for interacting with rabbitmq.
Handy tip:
If you've followed the write up till now, your docker should not autostart on machine boot. So, your containers wont be online for starting development. This little script should sort that out.
sudo service docker start
docker start local-dev-mongo
docker start local-dev-postgres
docker start local-dev-redis
docker start local-dev-rabbitmq
Put the above commands into a script(ex: ~/bin/start_docker_dev.sh) and run it when you want to use your dev services.
VS Code
VSCode is our editor of choice. Get it from https://code.visualstudio.com/download.
Choose the .deb option for download.
You should get a file called code_1.70.0-1659589288_amd64.deb in your Downloads folder.
The version number will be different.
cd ~/Downloads
sudo dpkg -i code_1.70.0-1659589288_amd64.deb
If you get dependency errors when doing this, run
$ sudo apt install -f
Open vscode and install the following extensions(Ctrl + Shift + x)
esbenp.prettier-vscode
eamodio.gitlens
dbaeumer.vscode-eslint
Terminator
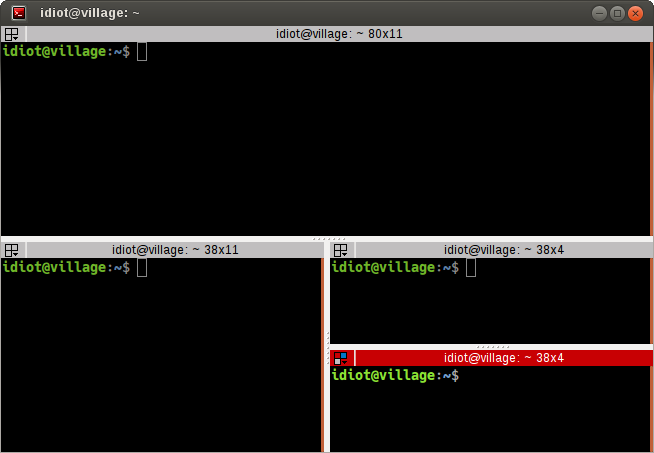
This is terminator. We can do vertical and horizontal splits in a single terminal window. Tabs work too :)
This is literally the only reason why we use it instead of gnome-terminal - the default terminal emulator in ubuntu.
$ sudo apt install terminator
Open terminator and right-click. Infinite productivity!
Tmux
Tmux is whats called a terminal multiplexer. Think of terminator, but just for the shell.
$ sudo apt install tmux
Create its config file ~/.tmux.conf.
# improve colors
set -g default-terminal 'tmux-256color'
set-option -g terminal-overrides ",xterm-256color:RGB"
# start window numbers at 1 to match keyboard order with tmux window order
#set -g base-index 1
#set-window-option -g pane-base-index 1
# renumber windows sequentially after closing any of them
set -g renumber-windows on
# Mouse
set-option -g mouse on

# Reload ~/.tmux.conf
bind-key R source-file ~/.tmux.conf \; display-message "Reloaded!"

set -g status-position bottom
set -g status-bg colour234
set -g status-fg colour137
set -g status-left ''
set -g status-right '#[fg=colour233,bg=colour241,bold] %d/%m #[fg=colour233,bg=colour245,bold] %H:%M:%S '
set -g status-right-length 50
set -g status-left-length 20
setw -g mode-keys vi

setw -g window-status-current-format ' #I#[fg=colour250]:#[fg=colour255]#W#[fg=colour50]#F '
setw -g window-status-format ' #I#[fg=colour237]:#[fg=colour250]#W#[fg=colour244]#F '
Postman
Postman is a tool for doing API testing. Get it from https://www.postman.com/downloads/.
This is not a .deb file that we can install with dpkg or apt. We're going
to have to be a bit manual about this.
$ cd Downloads/
$ tar -xzf Postman-linux-x64-7.32.0.tar.gz
$ sudo mkdir -p /opt/apps/
$ sudo mv Postman /opt/apps/
$ sudo ln -s /opt/apps/Postman/Postman /usr/local/bin/postman
$ postman
To create an entry in our application menu list, run
$ sudo nano /usr/share/applications/postman.desktop
and paste in
[Desktop Entry]
Type=Application
Name=Postman
Icon=/opt/apps/Postman/app/resources/app/assets/icon.png
Exec="/opt/apps/Postman/Postman"
Comment=Postman Desktop App
Categories=Development;Code;
Credits: tecmint
Slack
This is our internal messaging tool. Get it from https://slack.com/intl/en-in/downloads/linux.
Make sure we get the .deb file.
$ cd ~/Downloads
$ sudo dpkg -i slack-desktop-4.27.156-amd64.deb
If you get dependency errors when doing this, run
$ sudo apt install -f
Open slack, login and slack away!